Avoid common construction and apartment turnovers mistakes with these tips from the pros at Zanno Property Management.

Materials: What NOT to cut costs on:
Here are some items that we find are worth the extra couple dollars: caulking, paint, flooring, insulation (rock wool over fiberglass). These are all labor intensive and the extra cost up front will either cut down on labor or leave you with a longer-lasting product. With caulking, spending the extra couple bucks per tube will help ensure it does not crack, shrink, or get discolored too quickly. With paint, a good, quality paint will ensure better adhesion to the wall (if primed correctly), will likely take less coats, and sometimes will be a more vibrant color. Flooring is big, especially if going with an engineered and composite products. Vinyl plank flooring for instance comes in many varieties and the prices varies greatly. If going with a thin, cheaper flooring without much of a wear layer on top, it is likely it will wear away under heavy traffic as opposed to the product that costs double the money, but you will not have to replace in a couple years.
When in doubt, remove it.
Renovating a space can involve many intricate details and decision points. It might be tempting to assume that keeping existing walls will save time, but our experience has taught us otherwise! With older housing stocks, the timber they used back then is not necessarily compatible with today's building supplies. This could mean missing pieces like top or bottom plates which impede functionality when installing baseboard or crown moulding for example. Additionally by opting for new construction over refurbishing you ensure more room in your junction boxes for electrical devices and wires – it’s all about forward-planning efficiency!
Make sure the in-wall cavity is clean and clear.
If you're working on an old home, opening up the walls can take more effort than usual. It's important to keep track of any debris inside that wall and make sure it won't obstruct progress in the future - horsehair plaster is especially tricky since it often forms a layer several inches thick! Try your best to clear out as much excess material as possible before running items down through the cavity; this saved time will be well worth it when tackling similar projects later.
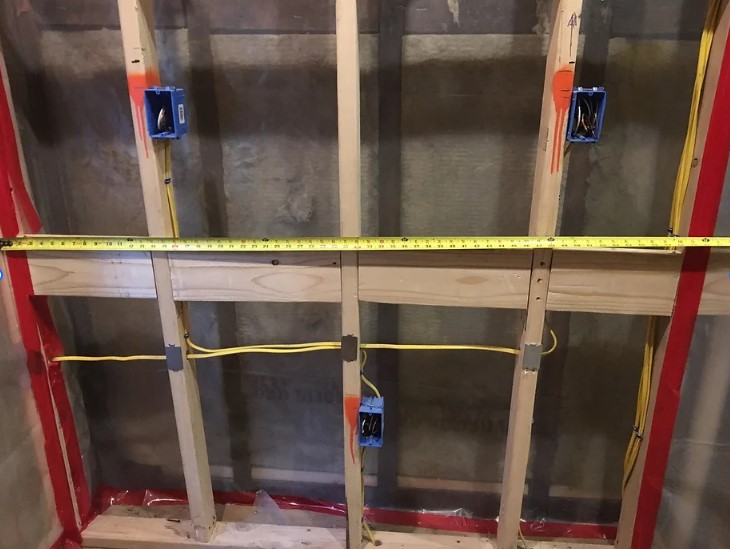
Take pictures before you close walls!
The amount of times we have referred back to our in-wall pictures is shocking. ProTip! Take a picture with a tape measure along the wall so you know exactly where items are if you need to mount something or miss something when cutting into the wall again (this is the cover photo on this post). Create a folder on your phone and keep these separate. You will thank yourself later. When hanging something like a TV, you want to know exactly where the blocking or devices are.
This is especially important to complete prior to the plasterer arriving. The plasterers usually go right over junction boxes in the walls to achieve a smooth finish. They then drop back and clean up the plaster around the outlet. In one of our recent renovations, we could not find why the light fixture in the bedroom was not getting any power. After tracing the lines back down to the panel and back up into the space, the in-wall photos were referenced as a last ditch effort. Come to find out an outlet in the wall was completely covered over with plaster and the pictures revealed it was there and its exact location. The light was getting power from this outlet which was not terminated yet.
There are many more lessons learned which may come in a part two, but until then remember to always think a couple steps ahead!

